30/06/2013

Scratch built barn

The old barn
     The run from Perry to the relocated town of Guthrie was quite long however it resided on a shelf that measures only 6 inches deep that then curves out to form part of the end of the peninsular to allow for my standard radius of 16 1/2 inches as it turns toward Guthrie. At the widest part the scenery looked a little bland and with very little detail. I was reading a copy of MR one day and came across a modeller who had scratch built a rather neglected barn in HO. I thought that something like this would be a good addition to fit this boring scenic area.
     So after a venture to the local hobby shop where I gathered some strip-wood and some corrugated iron I set too to construct my version of and old neglected barn. My first task was to weather the timber using my wash of alcohol and India ink to give the timber the aged look I was looking for. Once this had been set aside to dry I commenced construction. It didn't take that long to form the frame and line the outside with the pre weathered boards. I used the boards in a random fashion to give the effect that some had been replaced over many years and left others off as they would look in an old barn.
     And then some fun as I used a gas stove lighter to singe the timber for the burnt effect. That was scary as the alcohol set the fire raging and it was only luck that I was able to save all the work I had just completed.
     So this is the finished result

The windmill is an etch kit from Spirit Design and the trees are Scenic Express super trees

With some additional ground cover an old water tank and some timber that has rotted and been set fire to over the years and fallen from the roof this old barn now adds a bit of caricature to the overall effect as engineers roll by on their way to and from Guthrie.

More next time.
Rod.


22/06/2013

A few changes at Winfield

Changes at Winfield
     For some time John Fahey one of my good friends had been searching for the Walther's Medusa Cement Kit for his Santa Fe Boise City Sub layout without any success. As it happened I was looking to remove the one I had installed at Winfield as I felt it did not quite fit the position and area that I was modeling. So it came off the SFRSD and now resides on his layout at the town of Etter.
     Ron the owner of the CG&SF sent me some images of a small cement facility not that far from our homes that looked like it might do the trick at replacing the previous plant.
     So I set about to scratch build this new facility.
     I decided to construct the main building using Evergreen clapboard siding which to me in N Scale looks a lot like the siding being used on modern buildings back in the mid 80's and still today. The vertical hoppers are made using 5/8ths electrical conduit cut to length and capped with styrene. A few bits and pieces of scrap styrene for the small compressor shed, a piece of painted solder for the air hose, a quick spray with the air brush and the building was completed.
    It now resides at the left hand side of Winfield as the new Winfield Cement Plant.

The original Winfield Cement Plant without the additional detail I added to the roof.   

And the new Winfield Cement Plant
     This new building fits the area much better.

Just recently I have added a good deal more scenery around the plant and the main street of Winfield.
More next time. Catch you later thanks.
Rod.

12/06/2013

Moving to Car cards

My old operating system was a lot of work

     I have been operating my various N Scale layouts since about 1970 or so. My original cards were more of what to move and where to. These were written up by my long time friend Peter Hyde on 5"x 7"index cards and worked quite well. Of course in those days my layout was using Cab Control using the English Duet throttle with only one remote throttle available with which to run trains. So we had a card for Cab A and a card for Cab B. Looking back I do not know how we managed to have so much fun considering the constraints we had and what is available now. The locos only just ran and my roster at the time only consisted of 1 Minitrix U28, a Minitrix Fairbanks Morse, a Rivarossi Berkshire (that would not pull the skin off a rice pudding), a Sekisui Hudson and PA A unit.
     I used to allow myself two pound a week to purchase one box car a week. Anyway enough of this old stuff suffice to say we had some great times running trains until the wee hours of the morning.

Don't they look old


      So as you can see these are very old however they served their purpose very well for the time.
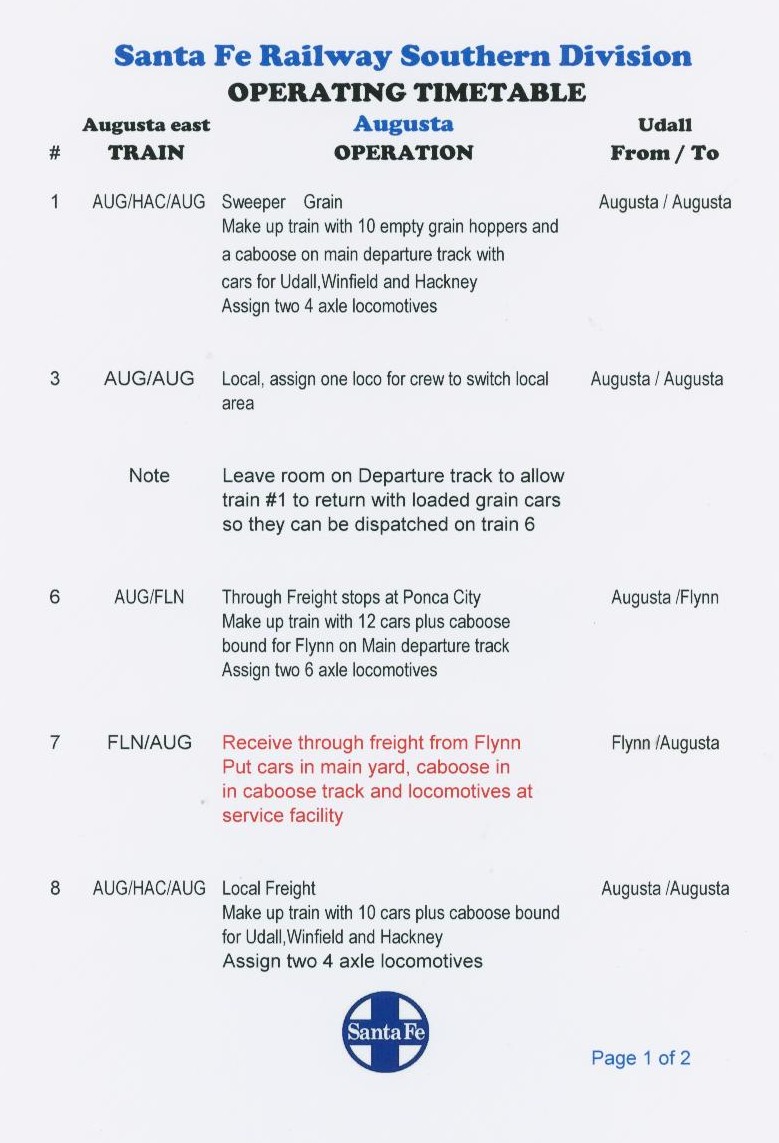
      On my current RR I had an operator stationed at each town and had made up a timetable of the Trains that would arrive along with "From" and "to" with instructions of what to do with each train before passing the train on to the next town. On some occasions this could take me up to 4 hours by the time I staged each loco and car into its appropriate location. This system lasted until I moved to DCC as mentioned in my last blog.


Car Cards
     On a trip to the USA back in 2005 I had the good fortune to visit Jim Younkins Mud bay & Southern RR quite a few years before moving to DCC. Jim was already using car cards ( as too a good friend Ron here in Melbourne) however Jim had pictures of each piece of rolling stock on its own Car Card. What a neat idea and one to bring back home. John Fahey was the first to go this way and so as soon as my layout was converted to DCC I started in this direction also. Lots of photo's and downloading to John Fahey and he was able in a very quick time set up all of my cards with the cars image ready for printing, cutting and folding. If I recall there was over 160 cards to cut, fold and stick to get them finished ready for me to write up each of the four way waybills.

Tools of the trade for assembling my car cards. Can you see the invisible tape.

A finished version with the car and number for easy recognition by my crew.

John also designed the way bill sheets so we could print them on both side for the 4 ways
     John did a fab job of cropping the car images so they stand out easily on the cards, thanks John.
     Well the next week was taken up writing up my waybills all in pencil so I could make changes easily without wasting cards.
Car Card Boxes
     I made these using 3 mm MDF and cut them all out using my table saw. In fact I think I have made many sets for friends layouts as many of us moved to this format of operating. They went together quite well and with a coat of flat black to match my fascia they were ready to install.

Three pockets, New arrivals, Loading or unloading and Ready for departure.

As almost all of my scenery is complete I added a small shelf to allow the guys to rest the cards during switching.
They work pretty well although sometimes they could be longer.

Here is a card car box located at Augusta with train cards hanging below. the white piece above is a track plan for crew to see where they are on the layout. A newer version just added is black with white lines and looks a lot better.

I also made boxes for my locomotives so that they get rotated after each run. 
Well that's about it for today, Hope you are having fun running your layout.
Rod.

03/06/2013

Moving to DCC

A move to DCC
     Although I was quite happy running the SFRSD on DC with cab control seeing some of my mates move in the DCC direction was a new area for me and one that I was not that comfortable in taking. With the size of my layout together with the number of locomotives on the roster I felt that it was a cost that I could ill afford and that the technology was way to over my head.
     At the National N Scale convention that was held in Adelaide in 2007 I heard that Digitrax were about to launch their Duplex system. This was a huge move, my layout had grown by 50% and would now work better with a walk around system and one that if I could enlist the help of close friends might consider. It would also help me move away from my current scheduling and operating system which was very time consuming for me to set up prior to each operating night. It would allow me to move to a car card system like that used on two friends layout one of which is the GC&SF seen on this blog from time to time.
     A long discussion with my fun and finance controller and it was decided that it could be done. So with some checking around I decided that I should go with the new Digitrax Duplex system. This would allow me to obtain the installation and technical support from my friends who had gone the Digitrax direction but not yet moved to the full Duplex version. It would save money as each member of my operating crew could bring their own throttle and with their help get the decoders installed in a timely fashion.
     So In mid 2009 the work began. My two good friends John Fahey and John Colliver and I set about to drop all of the track block wires, dismantle yard panels, remove all of the built-in home made throttles and purchase the necessary hardware to make the changeover. Brendan was given all of my locos to install the decoders some including Loksound in my GE U30 locos.

Block control switches ready for removal

What wires? John F and John C on the left dropping block wires

Is this one right?


A pile of hand made throttles removed from the layout
After 13 days spread over about 4 weeks the task was completed. Great job lads and the layout has never run better. Next the car cards.
That's it for today thanks for stopping by.
Rod.